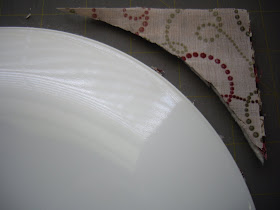


Cortar a 7.5 x 7.5 dos telas que combinen donde tela A es el frente del estuche y tela B es el forro. Un cuadrado de 7.5 x 7.5 de guata, relleno, fieltro o batting (recomiendo que sea delgada). Colocar la guata abajo, luego la tela A con derecho hacia arriba y tela B con derecho hacia abajo, con un plato como guia hacer un semi-circulo en la esquina derecha del cuadrado de telas (foto #2) cortar alrededor del plato (foto#3) luego coser alrededor del semi-circulo, preferiblente con overlock, o fileteadora o serger, sino hacer una costura alrededor del semi-circulo a 1/4" de la orilla (foto#4 y #5) con maquina de coser tradicional (esta costura es hasta el final del semi-circulo). Abrir y unir tela B en las esquina y tela A con guata en sus esquinas, como muestra la foto #6, luego unir ambas partes en las puntas, como muestra la foto#7 y coser en linea recta todas las capas a la misma vez( foto#8), para obtener como un rectangulo (foto# 9). Por la abertura que esta abajo, voltear el estuche por la tela B hacia la derecha y obtendremos la foto#10. Luego rematar la abertura inferior (foto#11) y volver a voltear el estuche para obtener el producto final como se muestra en la foto #12.
Cut a 7.5 x 7.5 two fabrick that can combined, where fabric A it’s the front of the case, and fabric B the inside. A square of 7.5 x 7.5 of wadding (I recommend a thin one). Put the wadding down, then on top of it fabric A upside up, and fabric B upside down, with a plate as a guide trace a semicircle on the right corner of the fabrics (picture 2) cut around the the plate (picture3) then sew around the semicircle preferably with over lock,or a single seam around the semi-circle about 1 / 4 "from the edge (picture 4 and5) with traditional sewing machine (this seam is to the end of the semi-circle). Open and join fabric B in the corners and fabric A with the wadding on its corners (picture6), them join both parts by the tips (picture7) and sewing in a straight line all the layers at the same time (picture 8) the result will be a rectangle (picture9). For the opening which is down, turn the case on the fabric B to the right (picture10). Then finish off the bottom opening (photo11) and turn the case back for the final product as shown in photo # 12.


No comments:
Post a Comment